What is Bleed and Why Does it Matter When Printing?
Learn the definition of and best practices for the important concept of bleed when it comes to printing documents, folders, binders or other office supplies.
Bleed Printing Example:
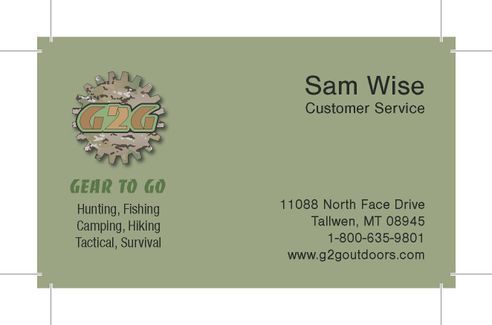
With Bleed Before Trimming

Card After Trimming "Final Size"
In the printing world, bleed is a very important concept that deals with the edges of paper and how it is printed or cut. Since printers essentially grab each sheet of paper by the edges to feed it through the printer, no printer is capable of printing all the way to the outer edge of the material.
In addition, paper and other material is often printed at a very high speed, which can cause it to not feed through the printer in exact perfect alignment—even when using a professional printing service.
If you print words, logos or images all the way to the edges of your template, they will likely end up appearing slightly cut off in the final product. Understanding bleed margins help prevent this problem by expanding the text or image outside of the designated printed area, resulting in a polished and professional final product.
How To Calculate the Final Document Size with Bleed
There are several ways to deal with bleed when it comes to printing. The first is to simply leave an appropriate margin around the edges of the material you’re printing to allow a slight margin of error for printing and cutting. The “safe zone” for printing text is a minimum of 0.25 inches inside the edge of the document (or cut line).
If you want images or other graphics to extend all the way to the very edges of the material, then the best way to do that is for the printer to print larger than what you want and then trim the edges off. For this reason, you want to extend the image beyond the size you want into the bleed zone. That way, when it’s cut, it trims off an extraneous portion of the image and you’re left with a clean, seamless print that goes to the edge of the document or binder.
A standard bleed area is generally .125 inches on each side. So, if you’re preparing a standard 11 x 8.5 inch document for printing, you will want the final template to actually be 11.125 x 8.625 inches. Or if you’re printing a custom background image on a on a standard 9 x 12 inch folder, the image should extend to at least 9.125 x 12.125 inches for each side.
Most common document only require a .125 inch margin; however, larger documents may require a larger bleed area. The standard bleed area for documents larger than 18 x 24 inches is generally .5 inches. For example, if you want to prepare an 18 x 24 inch document for printing, you will want to prepare an 18.5 x 24.5 inch template. Remember to also leave room for cutting.
There’s no way to be sure exactly where the bleed area will be cut, so be sure to extend images beyond the edge of the final document and all the way to end of the bleed zone. For instance, it would okay to extend a background design into the bleed zone, but you wouldn’t want to have a photo of someone in the bleed area or else you risk them getting cut from the final design.
Here a table of common document sizes and their measurements with bleed:
| Document | Finished Size | Size w/bleed | Bleed Size |
|---|---|---|---|
| Business card | 3.5 x 2 | 3.75 x 2.25 | .125 |
| Postcard | 6 x 4 | 6.25 x 4.25 | .125 |
| Invitation | 7 x 5 | 7.25 x 5.25 | .125 |
| Brochure (letter size) | 8.5 x 11 | 8.75 x 11.25 | .125 |
Note: Lafleur Printing primarily uses the Standard System (inches). If you work with the Metric System (centimetres), you can easily convert your measurements to inches by using the following formula: # centimetres ÷ 2.54 = inches (or inches x 2.54 = centimetres).
Still confused about bleed?
If you have any questions about bleed areas or what types of materials are best for extending into a bleed area, always be sure and talk to a printing specialist like Lafleur Printing before you place an order. A template can always be adjusted prior to printing, but once it’s printed, any adjustments are both costly and time consuming.